Mastodonを読む
はじめに †
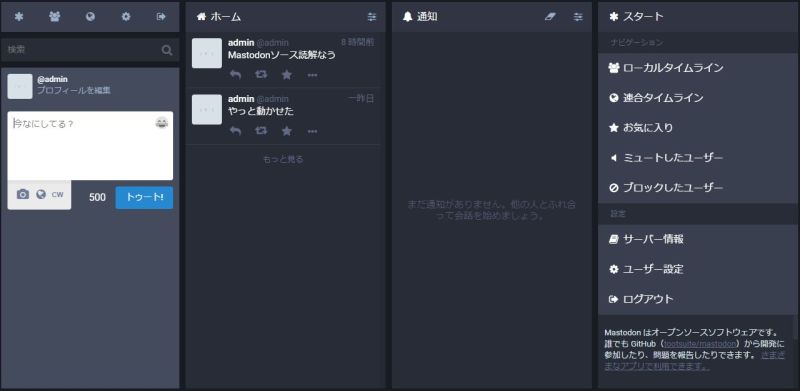
前回までで、「/」にアクセスしたときに返されるHTMLがわかりました。しかし、返されるHTMLは空のdivタグがひとつあるだけでした。もちろん、実際に表示される画面はそのような画面ではなく、以下のように表示されます。

これを行っているのがReactのようです。では読解を始めましょう。
app/assets/javascripts/application.js †
Reactについては「5分で理解する React.js」参照。この記事によると
  1
  2
  3
  4
| React.render(
<CommentBox />,
document.getElementById('content')
);
|
のように書くことでReactで定義したコンポーネントが描画されるとありますが、出力HTMLやmastodonソース以下をgrepしてみてもそのような記述は見当たりません。gemで処理されると言ってしまえばそれまでですが、どうにもすっきりしないのでどのように描画のトリガーがかかっているのかまず確認します。
ちなみに、これを読んでたちょうどそのころぐらいにJavascriptまとめるのはWebpack使うように変更したらしくて以降の記述はv1.3.2では当てはまりますが、HEADではファイルはそのままの位置にはありません_(┐「ε:)_
ビューにリンクされるJavascriptファイルのルートはapplication.jsになります。
念のため。「//」はJavascriptではコメントですが、Railsでは「//=」に意味を持たせています。requreで指定されたファイルを取り込んでいます。
app/assets/javascripts/components.js †
components.jsに移動。
  1
  2
  3
4
5
6
7
8
9
10
11
12
13
14
15
| -
|
!
-
|
|
!
-
!
|
window.React = require('react');
window.ReactDOM = require('react-dom');
window.Perf = require('react-addons-perf');
if (!window.Intl) {
require('intl');
require('intl/locale-data/jsonp/en.js');
}
window.Mastodon = require('./components/containers/mastodon');
|
Reactの記述が出てきました。Mastodonの文字も出てきましたが、ここでもまだ「じゃあ結局どのようにして動いているのか」がわかりません。
react-rails/lib/assets/javascripts/react_ujs.js †
Rails的にrequireされているreact_ujsに進みましょう。ここからreact-railsのgemに入ります。
1
2
3
4
5
6
7
| -
|
|
|
|
|
|
|
|
たくさんrequireされていますが、turbolinks~nativeは実はバリエーションで記述はほぼ同じです。
react_ujs_turbolinks.js †
react_ujs_turbolinks.jsを見てみましょう。
1
2
3
4
5
6
7
8
9
| -
-
-
-
|
|
!
!
!
| ;(function(document, window) {
window.ReactRailsUJS.Turbolinks = {
setup: function() {
ReactRailsUJS.handleEvent('turbolinks:load', function() {window.ReactRailsUJS.mountComponents()});
ReactRailsUJS.handleEvent('turbolinks:before-render', function() {window.ReactRailsUJS.unmountComponents()});
}
};
})(document, window);
|
初めのセミコロン何なんだろうと思ったのですが、前のファイルがセミコロンで終わってない時対策なのかな。それはともかく、Turbolinksオブジェクトにsetupメソッドが定義されています。handleEvent呼び出しを見ると画面が表示されるときに処理が行われるであろうことが予想できます。
react_ujs_event_setup.js †
react_ujs_event_setup.js。前半でhandleEventを定義し、後半で利用可能なものを確認して対応するsetupメソッドを呼び出しています。
  1
  2
  3
  4
  5
  6
  7
  8
  9
 10
 11
 12
 13
 14
 15
16
17
18
19
20
21
22
23
24
25
26
27
28
29
| -
-
!
-
-
|
!
-
-
|
!
!
-
-
-
-
!
-
-
!
-
|
!
-
|
-
|
!
!
| ;(function(document, window) {
var $ = (typeof window.jQuery !== 'undefined') && window.jQuery;
if ($) {
ReactRailsUJS.handleEvent = function(eventName, callback) {
$(document).on(eventName, callback);
};
} else {
ReactRailsUJS.handleEvent = function(eventName, callback) {
document.addEventListener(eventName, callback);
};
}
if (typeof Turbolinks !== 'undefined' && Turbolinks.supported) {
if (typeof Turbolinks.EVENTS !== 'undefined') {
ReactRailsUJS.TurbolinksClassic.setup();
} else if (typeof Turbolinks.controller !== "undefined") {
ReactRailsUJS.Turbolinks.setup();
} else {
ReactRailsUJS.TurbolinksClassicDeprecated.setup();
}
} else if ($ && typeof $.pjax === 'function') {
ReactRailsUJS.pjax.setup();
} else {
ReactRailsUJS.Native.setup();
}
})(document, window);
|
react_ujs_mount.js †
ではここまでわかったところで飛ばしたreact_ujs_mount.jsを見てみましょう。
  1
  2
  3
  4
  5
  6
  7
8
9
10
11
12
| -
-
!
|
-
-
|
!
|
-
|
!
| ;(function(document, window) {
var $ = (typeof window.jQuery !== 'undefined') && window.jQuery;
window.ReactRailsUJS = {
CLASS_NAME_ATTR: 'data-react-class',
PROPS_ATTR: 'data-react-props',
|
data-react-class属性は前回見たhome#indexの出力に含まれていました。
1
2
3
4
|
| <body class='app-body'>
<div data-react-class="Mastodon" data-react-props="{"locale":"ja"}" class="app-holder">div>
body>
|
mountComponentsの定義
1
2
3
4
5
6
7
8
9
10
11
12
13
14
15
16
17
18
19
20
| -
|
|
-
|
|
|
|
|
|
-
|
|
|
|
-
|
!
!
!
| mountComponents: function(searchSelector) {
var nodes = window.ReactRailsUJS.findDOMNodes(searchSelector);
for (var i = 0; i < nodes.length; ++i) {
var node = nodes[i];
var className = node.getAttribute(window.ReactRailsUJS.CLASS_NAME_ATTR);
var constructor = this.getConstructor(className);
var propsJson = node.getAttribute(window.ReactRailsUJS.PROPS_ATTR);
var props = propsJson && JSON.parse(propsJson);
if (typeof(constructor) === "undefined") {
var message = "Cannot find component: '" + className + "'"
if (console && console.log) { console.log("%c[react-rails] %c" + message + " for element", "font-weight: bold", "", node) }
var error = new Error(message + ". Make sure your component is globally available to render.")
throw error
} else {
ReactDOM.render(React.createElement(constructor, props), node);
}
}
},
|
renderありました。findDOMNodesは省略してgetConstructor
  1
  2
  3
  4
  5
  6
  7
  8
  9
10
11
12
13
14
15
16
17
18
19
20
21
22
23
| -
-
-
|
|
|
!
|
-
!
|
-
-
|
!
|
-
-
|
!
|
|
!
| getConstructor: function(className) {
var constructor;
constructor = window[className];
if (!constructor) {
constructor = eval.call(window, className);
}
if (constructor && constructor['default']) {
constructor = constructor['default'];
}
return constructor;
},
|
いろいろやっていますが、components.jsで
1
|
| window.Mastodon = require('./components/containers/mastodon');
|
と初期化されていたものが使われていると思われます。
おわりに †
今回はReactで画面描画がされる前段階として、そもそもReactがどのように呼び出されているのかを見てきました。動くのだろうけど、じゃあ実際どのような仕組みで動いているのかを見ることでアプリからの情報の読み込み、また、利用可能なライブラリを確認して分岐するのような泥臭い処理も確認できました。
次回はいよいよMastodonコンポーネントの中に踏み込んでいって実際の画面描画処理を見ていきます。ちょっと見た感じではReactというかReduxの処理を確認していくのがめんどくさそうでしたが(笑)
![[PukiWiki] [PukiWiki]](image/pukiwiki.png)
![[PukiWiki] [PukiWiki]](image/pukiwiki.png)